
QuickBooks ViewMyPaycheck users must convert to version 2 by 03/31/13. Here’s how:
Already using ViewMyPaycheck (Version 1)?
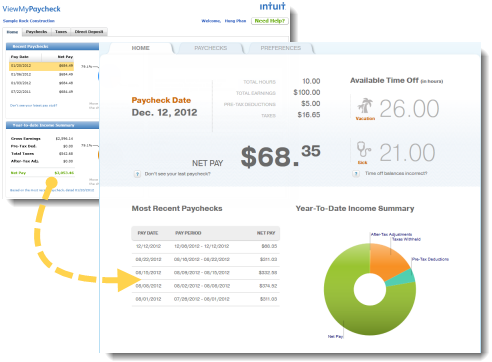
Thanks for being a loyal ViewMyPaycheck customer! We’ve made lots of great improvements in ViewMyPaycheck 2 based on suggestions from customers just like you. So check out some of the features, take it for a test drive (opens in a new window), and let us know what you think about it!
Ready to switch to ViewMyPaycheck 2? Here’s what you need to do.
(You only need to do this once!)

We recommend that you upload the current year’s paycheck info (from Jan 1, 2014 to today). And don’t forget to include the most recent paychecks. As a security measure when employees up for ViewMyPaycheck, we’ll ask them for the net amount from their last paycheck.
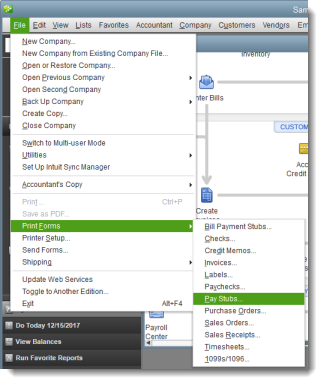
To upload paycheck info:
- Go to the File menu and click Print Forms > Pay Stubs.
- Enter a date range for the paychecks, or filter them by employee.
- Select the paychecks you want to send to ViewMyPaycheck, and click Send Online.
- On the Send/Receive Data window, click Send.
- When prompted, enter your payroll service PIN.
Tip: To reduce the time it takes to send paycheck info and minimize the chances of transmission errors, we recommend that you send no more than 100 to 250 paychecks at a time.
- Have employees start using the new ViewMyPaycheck portal.
Once you start sending paycheck information to Intuit for ViewMyPaycheck, just give your employees the website address:https://paychecks.intuit.com/.
Employees use their existing Intuit account ID and password (if they have one) or sign up for a new account. The first time they access their paychecks, they also need to enter their Social Security number and the net amount of their most recent paycheck.
Get a printed version (PDF) of these instructions.
- Once you’ve switched, all you need to do is run payroll as usual and click Send to Intuit to upload employee checks to ViewMyPaycheck.
Note: For a printable version of these instructions, check out the Quick Guide: ViewMyPaycheck. (PDF)
Have more questions? Check out our FAQs or contact us!
* Supported QuickBooks Versions: QuickBooks 2012 (and later)
If you have QuickBooks 2011, you’ll need to upgrade your version of QuickBooks to use ViewMyPaycheck 2.
Source: http://static.onlinepayroll.intuit.com/LearnMore/LearnMoreExistingViewMyPaycheck.html