Blog

Double Window Envelopes for QuickBooks Checks

Frequently we are asked, “What double window envelopes should I buy to mail QuickBooks checks in?”

First, we should note that the there is a different size envelope for checks and invoices…they are not interchangable, so please purchase carefully.

Go to our Amazon store: http://qbpros.net/store/ for GREAT PRICES (on both types of envelopes) and select the navigation link “QuickBooks Supplies” and there are a range of quantities and seal types that should suit you. We do not sell these, but simply point a link to the items and earn a commision for doing so.

Many generic envelopes will work well with QuickBooks checks. The common size is “#8 5/8”. The envelope has demensions of 3-5/8” x 8-5/8” and can be purchased from office supplies stores (such as Office Depot) for about 60% more money than our Amazon links listed above!


QuickBooks for Windows Shortcuts

QuickBooks Everyday Shortcuts

QuickBooks features many keyboard shortcuts that allow you to open, close, save and work with documents in a flash. The following shortcuts make working with QuickBooks even faster and easier:

QuickBooks Key or Keystroke Combination Shortcut Result
Ctrl-A Opens your Chart of Accounts
Ctrl-F Finds transactions, by amount, date, memo or name
Ctrl-G Goes to register of transfer account
Ctrl-H Displays history of any accounts receivable or payable transaction
Ctrl-I Goes to Create Invoice window
Ctrl-J Opens the Customer Centre
Ctrl-L Opens the relevant list for current drop-down menu
Ctrl-M Memorises current transaction or report
Ctrl-N Creates a new transaction in whatever window is active at the time
Ctrl-P Prints whatever form or register you have open at the time
Ctrl-Q Produces a QuickReport for a transaction or item
Ctrl-R Displays the account register
Ctrl-T Opens memorised transaction list
Ctrl-U Uses a list item (try Ctrl-L and Ctrl-U together for a winning team)
Ctrl-W Goes to Write Cheques
Ctrl-Y Opens transaction journal for that transaction
Ctrl-F4 Closes active window
F1 Opens help for active window

QuickBooks Date Changes

Want to enter or change a date in a QuickBooks entry? Entering and editing the date in QuickBooks is quick and easy when you use these very handy QuickBooks keyboard shortcuts.

QuickBooks Key or Keystroke Combination Shortcut Result
+ Next day
Previous day
T Today
W First day of the Week
K Last day of the weeK
M First day of the Month
H Last day of the montH
Y First day of the Year
R Last day of the yeaR
Alt-↓ Date calendar

QuickBooks Keyboard Combination Trade Secrets

The following table of QuickBooks keyboard shortcuts shows you how to quickly and easily access useful information and commands, as well as closing and opening QuickBooks:

QuickBooks Key or Keystroke Combination Shortcut Result
Ctrl (while opening) Starts QuickBooks without a company file
Alt (while opening) Closes windows which were open last time you closed the file
F2 Displays very nerdy info about your current QuickBooks version
Right-click Shows a list of nifty commands related to wherever you are

Moving Around in QuickBooks with Keyboard Shortcuts

Every QuickBooks command includes an underlined letter. To execute a command in QuickBooks, press the Alt key followed by the relevant letter. Here are some examples:

QuickBooks Key or Keystroke Combination Shortcut Result
Alt B, I Goes to the Banking menu, followed by Import Bank Statement
Alt C, T Goes to the Company menu, followed by the To Do List

Combine your Alt key with a few other keyboard tricks to fly around QuickBooks at a rate of knots:

QuickBooks Key or Keystroke Combination Shortcut Result
Tab Next field
Shift-Tab Previous field
Home Beginning of current field
End End of current field
Ctrl-Page Up First item on list or previous month in register
Ctrl-Page Down Last item on list or next month in register

Fast Editing with QuickBooks Keystrokes

When you’re working with QuickBooks you’ll want to edit your files. One of the great features of QuickBooks is these keyboard shortcuts, which will help you fly through your bookkeeping.

QuickBooks Key or Keystroke Combination Shortcut Result
+ Increases cheque or invoice number by one
Decreases cheque or invoice number by one
Ctrl-C Copies your selection to the Clipboard
Ctrl-D Deletes current transaction or item (if allowed)
Ctrl-E Opens transaction selected in register, ready for editing
Ctrl-V Pastes whatever is currently sitting in your Clipboard
Ctrl-X Moves your selection to the Clipboard
Ctrl-Z Undoes your last action (within current field only)
Ctrl-Del Deletes line from detail area
Ctrl-Ins Inserts line in detail area
Ctrl-Enter Records the current transaction

LinkedIn Confirms Account Passwords Hacked

Best course of action seemd to be to change your password.

http://www.pcworld.com/article/257045/update_linkedin_confirms_account_passwords_hacked.html

http://www.latimes.com/business/technology/la-fi-tn-eharmony-hacked-linkedin-20120606,0,4578300.story

Partners are not employees and should not be issued a W-2

A partnership is the relationship existing between two or more persons who join to carry on a trade or business. Each person contributes money, property, labor or skill, and expects to share in the profits and losses of the business.

A partnership must file an annual information return to report the income, deductions, gains, losses, etc., from its operations, but it does not pay income tax. Instead, it “passes through” any profits or losses to its partners. Each partner includes his or her share of the partnership’s income or loss on his or her tax return.

Partners are not employees and should not be issued a Form W-2. The partnership must furnish copies of Schedule K-1 (Form 1065) to the partners by the date Form 1065 is required to be filed, including extensions.

Source: http://www.irs.gov/businesses/small/article/0,,id=98214,00.html

How to Enable or Disable Quick Launch in Windows 7

How to Enable Quick Launch in Windows 7

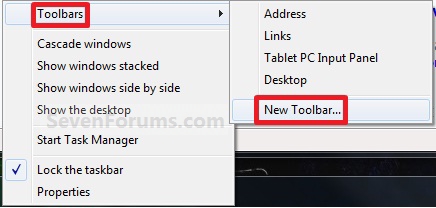
1. Right click on a empty space on the taskbar, then select (hover on) Taskbar and click on New Toolbar. (See screenshot below)

Quick Launch - Enable or Disable-right_click_taskbar.jpg

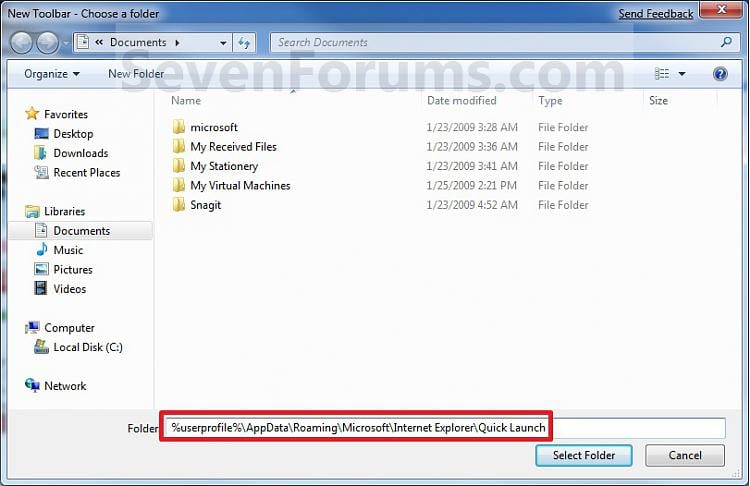
2. In the Folderline, type or copy the location below. (See screenshot below)

%userprofile%\AppData\Roaming\Microsoft\Internet Explorer\Quick Launch

Quick Launch - Enable or Disable-select_folder.jpg

3. Click on the Select Folder button. (See screenshot above)

4. You now have a Quick Launch toolbar on the taskbar. (See screenshot below)
NOTE: Click on the arrow to see your Quick Launch shortcuts.

Quick Launch - Enable or Disable-quick_launch_toolbar.jpg

5. To Expand the Quick Launch Toolbar

A) Unlock the taskbar.

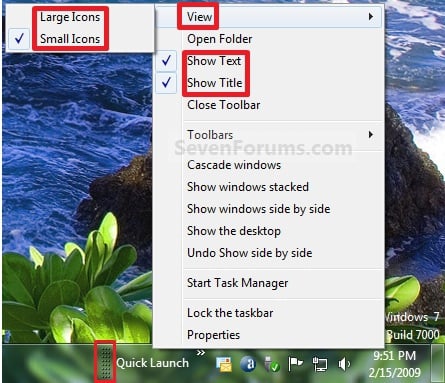
B) Left click and hold on the dotted separator line just to the left of Quick Launch, then drag it to the left or right to adjust to unhide all of the icons. Release the left click when done. (See screenshot below)

Quick Launch - Enable or Disable-right_click_toolbar.jpg

C) Lock the taskbar.

6. To Remove Quick Launch Toolbar Icon Text or Title

A) Unlock the taskbar.

B) Right click on the dotted separator line just to the left of Quick Launch, then uncheck the Show Text and Show Title by clicking on them. (See screenshot below step 5B)

C) Lock the taskbar.

7. To Have Small or Large Icons for Quick Launch Toolbar

A) Unlock the taskbar.

B) Right click on the dotted separator line just to the left of Quick Launch, then click on View and select to have Large Icons or Small Icons. (See screenshot below step 5B)

C) Lock the taskbar.

8. To Have Quick Launch Toolbar on Left Side of Taskbar

A) Unlock the taskbar.

B) Left click and hold on the dotted separator line just to the left of Quick Launch, then drag Quick Launch as far to the left on the taskbar as you are able to and release.

B) If you still have any pinned program icons to the left of Quick Launch, then left click and hold on the dotted separator linejust to the left of the icons and hold, and drag it to the right past Quick Launch and release. (See screenshot below)

Quick Launch - Enable or Disable-rightside_1.jpg

C) The Quick Launch toolbar is now on the far left side of the taskbar. (See screenshot below)

Quick Launch - Enable or Disable-rightside_2.jpg

D) Left click and hold on the dotted separator line for the other icons and drag them left or right to make any adjustments to how you want them placed on the taskbar. (See screenshot above)

E) Lock the taskbar.


http://www.sevenforums.com/tutorials/888-quick-launch-enable-disable.html

To unlock the Task bar:

1. Right click on a empty space on the taskbar.

2. To Lock the Taskbar

A) Click on Lock the taskbar to check it. (See screenshot below step 3)

3. To Unlock the Taskbar

A) Click on Lock the taskbarto uncheck it. (See screenshot below)

Name:  Lock-1.jpg
Views: 48260
Size:  33.6 KB

http://www.sevenforums.com/tutorials/1065-taskbar-lock-unlock.html


Resort QuickBooks lists when names or items are out of order or missing

Resort QuickBooks lists when names or items are out of order or missing

  • A list appears out of order
  • Some of your list elements are missing
  • New entries appear at the top of your list
  • Reports appear out of order
  • You aren’t able to do things like turn on account numbers
  • Highlighting a customer, vendor or employee displays no transactions
  • Name filter drop-down auto-fill not working in the Advance Find

Re-sort the Master Name list from the Banking menu:

  1. In the QuickBooks menu bar, choose Banking > Write Checks.
  2. Click into the Pay to the order of field and press Ctrl+L.
  3. Select the Include Inactive checkbox.
  4. Click the Name button, and select Resort List.
  5. Click OK on the message “Are you sure you want to return this list to its original order.”

Re-sort any other List (Chart of Accounts, Item List, Payroll Item List, etc.):

  1. In the QuickBooks menu bar, choose Lists and then select the list you want to re-sort.
  2. Select the Include Inactive checkbox.
  3. Click the List button at the bottom left.
  4. Click Resort List.
  5. Click OK on the message “Are you sure you want to return this list to its original order?”

Important: After re-sorting your lists, close your company data file and reopen it to be sure the changes to your lists are completed.

Source:  http://support.quickbooks.intuit.com/support/Articles/SLN40562

Troubleshooting Point of Sale Connectivity Tool

http://support.quickbooks.intuit.com/support/Articles/HOW12643

Mac Flashback Anti-Trojan Tool

Mac Flashback Anti-Trojan Tool

http://www.macobserver.com/tmo/article/norton_kapersky_release_flashback_anti-trojan_tools/


QuickBooks Point of Sale System Requirements #POS

QuickBooks Point of Sale System Requirements

Version 10

Recommended Configurations:

  • At least 2 GB of RAM for a single workstation installation
  • 1 GB of disk space (additional space required for data files)
  • Optimized for 1024×768 screen resolution
  • Operating Systems (North American versions of Windows only):
    • Microsoft Windows XP (SP3 or later strongly recommended), all editions.
    • Windows Server 2003
    • Windows Vista, all editions (SP2 or later strongly recommended)
    • Windows Server 2008
    • Windows 7
  • Data import/export and Microsoft Office Integration requires full versions of the following:
    • Microsoft Excel 2000, 2002, 2003, 2007 or 2010
    • Microsoft Word 2000, 2002, 2003, 2007 or 2010

Multi-user Recommendations:

  • Multi-core processor and 2 GB of RAM are recommended for better performance on the Point of Sale server workstation.
  • In a multi-user configuration, each workstation concurrently running Point of Sale must have a separately purchased user license and every copy of Point of Sale must be the same version and level.
Version 7 through 9

The minimum system requirements for Point of Sale Version 7 through 9 are:Windows XP / Server 2003:

  • Single User: 1.6 GHz processor (2.0 GHz recommended)
  • Multiple Users: 2.0 GHz processor (2.8 GHz recommended)
  • 256 MB RAM (512 MB recommended)
  • 1 GB free disk space (additional space required as data files grow)
  • 4x CD-ROM
  • Optimized for 1024 x 768 resolution
  • Windows XP SP2 or later recommended (North American versions of Windows only)
  • *Windows 2000 is no longer a supported operating system.
  • Microsoft Excel 2003 and 2007

Windows 7 / Vista / Server 2008:

  • Single User: 1.6 GHz processor (2.0 GHz recommended)
  • Multiple Users: 2.0 GHz processor (2.8 GHz recommended)
  • 512 MB RAM (1 GB recommended)
  • 1 GB free disk space (additional space required as data files grow)
  • 4x CD-ROM
  • Optimized for 1024 x 768 resolution
  • North American versions of Windows only
  • Microsoft Excel 2003 and 2007
Version 6

The minimum system requirements for Point of Sale Version 6 are:Windows 2000 / XP:

  • 500 MHz Pentium III or equivalent (1 GHz recommended)
  • 256 MB RAM (512 MB recommended)
  • 250 MB free disk space (additional space required as data files grow)
  • 2x CD-ROM
  • 800 x 600 resolution (1024 x 768 recommended)
  • Windows XP SP2 or later recommended

Windows 7 / Vista:

  • 500 MHz Pentium III or equivalent (1 GHz recommended)
  • 512 MB RAM (1 GB recommended)
  • 250 MB free disk space (additional space required as data files grow)
  • 2x CD-ROM
  • 800 x 600 resolution (1024 x 768 recommended)
Version 5

The minimum system requirements for Point of Sale Version 5 are:

  • Windows 2000 / XP
  • 500 MHz Pentium III or equivalent (1 GHz recommended)
  • 256 MB RAM (512 MB recommended)
  • 250 MB free disk space (additional space required as data files grow)
  • Windows 2000/XP (Windows 98 and Windows Vista are not supported)
  • 2x CD-ROM
  • 800 x 600 resolution (1024 x 768 recommended)
  • Windows XP SP2 or later recommended

Note: While Point of Sale will run on a 64 bit computer, it will only function reliably when installed on a 32 bit version of Windows.

Version 4

The minimum system requirements for Point of Sale Version 4 are:

  • Windows 98(SE) / 2000 / XP
  • 500 MHz Pentium III or equivalent (1 GHz recommended)
  • 256 MB RAM (512 MB recommended)
  • 250 MB free disk space (additional space required as data files grow)
  • 2x CD-ROM
  • 800 x 600 resolution (1024 x 768 recommended)
  • Windows XP SP2 or later recommended

Note: While Point of Sale will run on a 64 bit computer, it will only function reliably when installed on a 32 bit version of Windows.

If this solution does not resolve the issue, you can read discussions and post messages and questions relating to your issue on the QuickBooks Point of Sale Community Forum. You can also review other available QuickBooks Point of Sale support options for additional guidance.

Source: http://support.quickbooks.intuit.com/support/articles/INF12500

Revised Definition of a New Hire beginning on 04/21/12

The Trade Adjustment Assistance Extension Act of 2011 (PUblic Law 112-40), which amends Section 453A (a) (2) of the Social Security Act, includes a revised definition of “newly hired employee” to include any worker:
1. not previOusly employed by the employer; or
2. previously employed by the employer but separated from such prior employment for at least 60 consecutive days.

 As of April 21, 2012, you must report to your state agency as a new category, those former employees whom you re-employed after they were separated for more than 60 days. All previous new-hire requirements (New Hire Reports / New Hire Reporting) remain in place.

Source: http://www.gpo.gov/fdsys/pkg/BILLS-112hr2832enr/pdf/BILLS-112hr2832enr.pdf (Page 22)