Blog

QuickBooks 2014 Critical Fixes updates (ULIP) – Patch May Not Be Installed

QuickBooks 2014 Export to Excel has been a problem for some. Intuit issued a QuickBooks 2014 Critical Fixes updates (ULIP), but sometimes these patches may not be installed, here’s how to tell and how to make sure they install correctly.

http://support.quickbooks.intuit.com/support/Articles/INF23122

Patch available for trouble exporting to Excel from QuickBooks Enterprise

Patch available for trouble exporting to Excel from QuickBooks Enterprise

http://dataservices.intuit.com/support/articles/sln83589

Unable to export to Excel after updating to QuickBooks 2014 R5

Unable to export to Excel after updating to QuickBooks 2014 R5

In QuickBooks 2014 R5, you are unable to export reports to Excel (such as a transaction journal or A/R aging report) or emailing reports as an Excel document.

When clicking the export button (or email– Send Report as Excel), you will not see the export to Excel option appear like it will for other reports. This is intermittent, as it may happen, then stop occuring.

What you can try now

Unable to export a Transaction Journal report to Excel, export via the Customer Center:

    1. Open the Customer Center and find the transaction in the Transactions pane.
    2. Right-click on the transaction you want to see a Transaction Journal on.
    3. Choose Transaction Journal.

    1. Click the Excel button and choose Create New Worksheet to export your report to Excel.


Open the Item List first, then open your report:

This issue only occurs if you try to access your report when you were previously on a transaction form (Invoice, Sales Order, Purchase Order, Bill, etc).  If you open the report after being on a non-transaction form (such as the Item list of Chart of Accounts), the report will be able to export to Excel.

  1. Open the Item List (List– Item List)
  2. Open the report you want under the reports menu (any report).
  3. Export to Excel by clicking the Excel drop down or email as Excel by clicking the Email button.

Source: http://dataservices.intuit.com/support/articles/sln83589

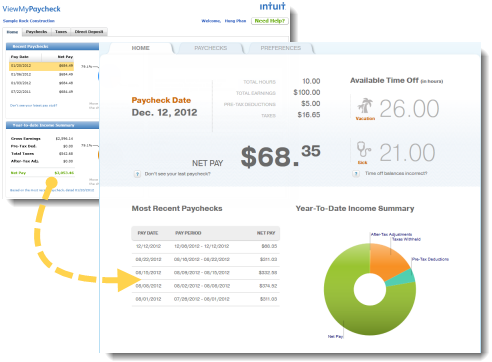
Welcome Your Employees to QuickBooks ViewMyPaycheck2

Welcome Your Employees to QuickBooks ViewMyPaycheck2

http://static.onlinepayroll.intuit.com/LearnMore/PDF/ViewMyPaycheck.pdf

QuickBooks ViewMyPaycheck users must convert to version 2 by 03/31/13

QuickBooks ViewMyPaycheck users must convert to version 2 by 03/31/13. Here’s how:

Already using ViewMyPaycheck (Version 1)?

On March 31, 2014, ViewMyPaycheck 1 will no longer be available.

Thanks for being a loyal ViewMyPaycheck customer! We’ve made lots of great improvements in ViewMyPaycheck 2 based on suggestions from customers just like you. So check out some of the features, take it for a test drive (opens in a new window), and let us know what you think about it!


ViewMyPaycheck 1 to ViewMyPaycheck 2

Ready to switch to ViewMyPaycheck 2? Here’s what you need to do. 
(You only need to do this once!)

    1. Install the latest QuickBooks* maintenance release and payroll updates. How?
    2. Turn on ViewMyPaycheck in QuickBooks. How?
    3. Upload the current year’s paychecks to ViewMyPaycheck. How?

We recommend that you upload the current year’s paycheck info (from Jan 1, 2014 to today). And don’t forget to include the most recent paychecks. As a security measure when employees up for ViewMyPaycheck, we’ll ask them for the net amount from their last paycheck.

To upload paycheck info:

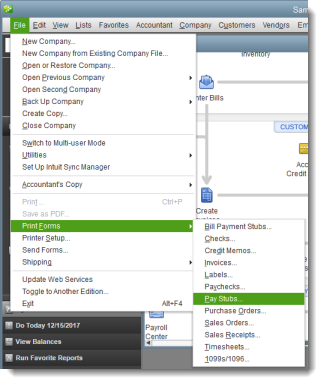
    1. Go to the File menu and click Print Forms > Pay Stubs.

      Pay Stubs

    1. Enter a date range for the paychecks, or filter them by employee.
    1. Select the paychecks you want to send to ViewMyPaycheck, and click Send Online.
    1. On the Send/Receive Data window, click Send.
  1. When prompted, enter your payroll service PIN.

Tip: To reduce the time it takes to send paycheck info and minimize the chances of transmission errors, we recommend that you send no more than 100 to 250 paychecks at a time.

    1. Have employees start using the new ViewMyPaycheck portal.

Once you start sending paycheck information to Intuit for ViewMyPaycheck, just give your employees the website address:https://paychecks.intuit.com/.

Employees use their existing Intuit account ID and password (if they have one) or sign up for a new account. The first time they access their paychecks, they also need to enter their Social Security number and the net amount of their most recent paycheck.

Get a printed version (PDF) of these instructions.

  1. Once you’ve switched, all you need to do is run payroll as usual and click Send to Intuit to upload employee checks to ViewMyPaycheck.

Note: For a printable version of these instructions, check out the Quick Guide: ViewMyPaycheck. (PDF)

Have more questions? Check out our FAQs or contact us!


Supported QuickBooks Versions: QuickBooks 2012 (and later)
If you have QuickBooks 2011, you’ll need to upgrade your version of QuickBooks to use ViewMyPaycheck 2.


Source: http://static.onlinepayroll.intuit.com/LearnMore/LearnMoreExistingViewMyPaycheck.html

QuickBooks Attached Documents Feature

The QuickBooks Attached Documents Feature seems to be handy, as it allows you to attach document(s) scanned or already on your computer to a transaction in QuickBooks.

It’s now a part of QuickBooks without needing a subscription, the files are stored locally where the company file is stored, in a sub-folder named Attach. You can drop a file in the document center (Top menu > Company >Documents >Doc Center) which causes the file to be stored in “…\Attach\Inbox” and then later you can attach it to a transaction, or you can attach a document to a transaction without having to put it in the inbox first.

To attach a document to transaction, whether already existing on the computer yet or not, open the transaction, then click the paperclip icon and make a selection of what you want to attach.

After a document that has been first put in the Inbox then has been attached to a transaction, the file physically moves to sub-folder of “…\Attach\Txn”. That sub-folder’s name is derived by some unique identifier. There is no report in QuickBooks that shows this identifier, so there’s no way to know what the folder in the Windows represents, although you can open the docs inside.

DO NOT rename the file in Windows otherwise the link with the QuickBooks database will be broken. If you must re-name, you will need to un-attach the document. Copy the document somewhere else first because it will be deleted upon detach. Then change the name of the moved file, , and re-attach to the transaction. You can detach/re-attach from the same screen as you attached the document.

To view the attached document, open the transaction, then click the paperclip icon and make a selection of what you want to attach, and click the Open button.

To see FAQ: http://support.quickbooks.intuit.com/support/articles/INF12895

Other sources: http://dataservices.intuit.com/support/articles/sln58984

Windows 8 Numberpad Not Working?

Windows 8 Numberpad Not Working?

Click on Start –> Control Panel –> Ease of Access –> Ease of Access Center –>

Click on “Make the mouse easier to use” –> Under Control the mouse with the

keyboard, uncheck the check box “Turn ON Mouse Keys” –> Click on OK.


If you are connecting in via LogMeIn, in the LMI Options (Top Menu)

Select Options > From Keyboard dropdown menu > select Use Client Layout

Merchant Chargeback Process

Chargebacks are an unpleasant fact of life for merchants. Hopefully, chargebacks will be a rare event for you, but you should know how to protect yourself.

chargeback is a transaction that has been disputed by a customer. Chargebacks occur for a variety of reasons. For example, the customer may be unsatisfied with the merchandise, or a criminal may have made fraudulent use of their credit card number. When a customer disputes a charge, you receive a chargeback notification (sometimes called a Chargeback Advice form), and the amount of the original transaction is credited to the customer’s account, and debited from yours. (In other words the transaction is “charged back” to you.) You have a right to challenge the chargeback by sending in a rebuttal. Intuit works hard to fight chargebacks on your behalf. To assist us, please respond promptly and file requested paperwork by the submission deadline. You can track and manage chargebacks from the Merchant Service Center.

Chargeback Process graphic

NOTE: When a cardholder initiates a dispute, the cardholder’s bank immediately generates a chargeback. QuickBooks Payments is not aware of any problem until we receive the chargeback. The cardholder does not have to notify you, the merchant, prior to contacting their bank. A retrieval request sometimes precedes a chargeback, but not necessarily (read on to learn more about retrieval requests).

What is a retrieval request?

A retrieval request is a request from the customer’s card issuer to the merchant asking for documentation (like sales receipts, invoices, and contracts) relating to a customer charge. A retrieval request may precede or be part of a chargeback. When you receive a retrieval request, you must mail or fax the requested documentation to Intuit Payment Solutions as instructed immediately (and at least within the time frame specified by the document). If the documentation you provide settles the question, it may stop the chargeback from proceeding any further.

How can I dispute a chargeback?

When you receive a chargeback, you may file a rebuttal, unless you receive a No Recourse Chargeback notification. To dispute a chargeback, furnish any relevant documentation, include the chargeback notice document and mail, fax or email it all to QuickBooks Payments ChargeBack Department promptly and as instructed on your Chargeback Advice form. Receive, track and download these notifications through the Merchant Service Center.

If the chargeback is resolved in the your favor, please note that it could take up to 65 days to receive funds. If the transaction is still disputed, you receive a second notification about the chargeback status. Follow instructions in that notification.

How can I avoid potential chargebacks?

Many chargebacks can be prevented. Follow these best practices when processing transactions and dealing with customers:

  • If an authorization request is declined, don’t process the transaction or repeat the authorization request.
  • For all card-present transactions, swipe the card or make a physical imprint of the card to prove that the card was present.
  • Have the cardholder sign a receipt. Retain receipt copies for at least 18 months.
  • For card-not-present transactions use AVS (Address Verification Service) and obtain the Card Security Code to confirm the purchaser is in possession of the card. (Not sure what these terms mean? Visit the Merchant Service Center’s Resource Center to learn more.)
  • Keep customers informed about transaction status, merchandise availability and delivery.
  • Clearly state your refund, return and delivery policy to set customer expectations properly.
  • Make sure that your DBA (Doing Business As) name is easily identifiable so customers recognize your transactions on their monthly credit card statement.
  • Include your phone number and contact information on receipts and invoices. Make it easy for customers to reach you before calling their card issuer.
  • If you ship goods, obtain and keep proof of delivery.
  • Never refund a different credit card number. Credit only the card that made the purchase.
  • Deposit sales and credit receipts as quickly as possible (definitely within 5 days of the transaction).

Chargeback FAQ: http://kbgopayment.intuit.com/intuit/index?page=gopayment_content&id=INF20356

Source:  https://merchantcenter.intuit.com/wapweblet/ims-mp-help/en/qbms/svc_mp_learn_about_chargebacks.html

Improving Cash Flow with Fundbox

Charlie Russel authores an great article on an innovative new service for small businesses to improving cash flow by financing their receivables with Fundbox.

http://www.sleeter.com/blog/2014/02/improving-cash-flow-fundbox

Obamacare – Extra Time to Small and Large Businesses

Treasury and IRS Issue Final Employer Mandate Rules for Obamacare, Giving Extra Time to Small and Large Businesses:

http://www.accountingtoday.com/news/Treasury-IRS-Issue-Final-Employer-Mandate-Rules-Obamacare-69572-1.html?utm_campaign=tax%20pro%20today-feb%2012%202014&utm_medium=email&utm_source=newsletter&taxpro=1